This page here has been created for the latest stable release of Salvus. You have chosen to view the documentation for another Salvus version. Please be aware there might be some small differences you have to account for.
Salvus on Apple M-Series Chips
If your computer is equipped with one of the latest M-series chips (M1, M2, or M3) please follow the instructions given below to install Salvus.
1. Where to Install
Details on where to run Salvus: Where to Run Things?
The first step to install Salvus is to figure out where every component of it will run. The most common case is to have a full installation locally and additionally install a version of SalvusCompute on a larger workstation or cluster.
2. Install Rosetta
Rosetta is a translation layer for applications written for Intel chips that enables the M-series chip to run them as well. It is provided by Apple.
To install Rosetta, open a terminal and type:
/usr/sbin/softwareupdate --install-rosetta --agree-to-license
3. Set up your Terminal to use Rosetta by default
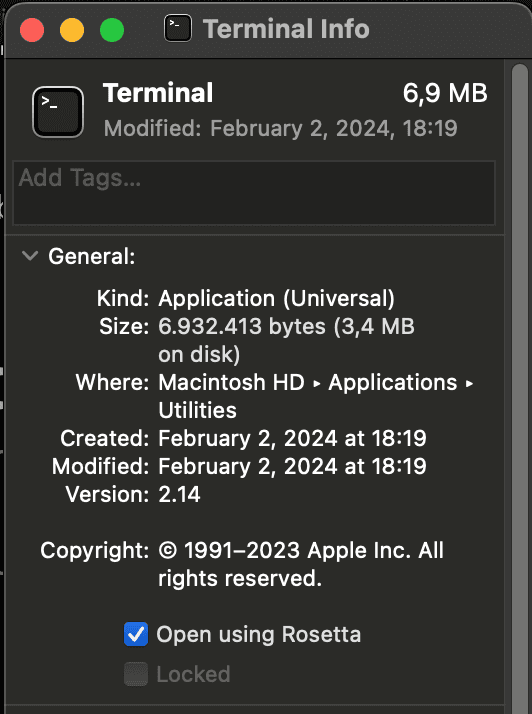
Navigate to your /Applications folder and right click on your preferred
Terminal Application (The default Mac Terminal is located in /Applications/Utilities)
then select Get Info. In the window that opens, select Open with Rosetta as shown
in this picture:

Reopen the terminal.
If you want to keep your original Terminal running without Rosetta,
consider using iTerm. Once installed, right-click
on your iTerm application and select Duplicate. Now rename the duplicated iTerm
application to something like iTerm (Rosetta). Now apply the procedure shown in the
picture above to use Rosetta by default on this duplicated terminal and proceed with
the following steps.
4. Install Python Packages
Details on the Python installation: Python Packages
Salvus depends on Python and a number of third party packages. We recommend to use the Miniconda distribution as package manager: Install Miniconda from here. Make sure to grab a version that is compatible with the M-series chips.
Unlike on other systems, we do not recommend using mamba on Apple M-series computers.
You can now choose between two supported versions of Python:
Python 3.9 or 3.11 (recommended for new users)
First, you need to download the list of python dependencies by running:
curl https://mondaic.com/environment-py39.yml -o environment.yml
or
curl https://mondaic.com/environment-py311.yml -o environment.yml
depending on your preference for Python version.
Next, please run the following commands to create a Salvus environment and install all dependencies. Make sure that you use a Terminal that was configured to use Rosetta as described above.
# Create a new environment with all required dependencies. CONDA_SUBDIR=osx-64 conda env create -n salvus -f environment.yml # Activate that environment. conda activate salvus
Python 3.7 (will be deprecated with the next major release)
Python 3.7 has reached end of life (EOL) in June 2023, and we only keep supporting a legacy environment with fixed version numbers. See here for details on how to set it up.
5. Run the Downloader
Details on the Mondaic Downloader: Mondaic Downloader
To download Salvus and install the Salvus Python module run the following two commands. Select the X86_64 CPU microarchitecture when prompted for it.
# Run the Mondaic downloader. bash -c "$(curl -sSL https://get.mondaic.com)" # Install the Python Salvus package into the previously created python # environment. pip install ~/Salvus/python_packages/salvus-*.whl
6. Configure SalvusFlow
Details on the SalvusFlow configuration: SalvusFlow Configuration
The last step is to teach Salvus how to run on your specific machine. Please run this interactive wizard to get started:
salvus-cli add-site
7. Start to Learn Salvus
Salvus should be all ready by now so time to learn how to use it. We recommend to start with this tutorial.
 Mondaic